
最近给 OpenCode 换了个启动 Logo,把默认的 OpenCode 字样换成了自己的品牌名「LorenzoFeng」。整个过程踩了几个坑,记录一下完整的 TUI 插件开发流程。
为什么不能用配置文件
直觉上,换个 Logo 应该是配置项的事。OpenCode 确实有过一个 PR(#12017)试图在 opencode.jsonc 里加 "logo" 字段,但被维护者关了,理由是:
“You can customize it with tui plugins.”
也就是说,OpenCode 的 TUI 定制走的是插件机制而非配置项。Logo、侧边栏、底部状态栏都通过 slot 机制暴露给插件。
TUI 插件的 Slot 机制
OpenCode 的 TUI 界面由一系列 slot(插槽) 组成,插件可以注册到其中进行替换或追加:
| Slot 名称 | 位置 | 说明 |
|---|---|---|
home_logo | 首页 Logo | 我们要替换的目标 |
home_prompt | 首页输入框 | 可替换为自定义输入组件 |
home_bottom | 首页底部 | OS / Provider 信息 |
home_footer | 页脚 | 状态栏下方 |
sidebar_title | 侧边栏标题 | 会话标题 |
sidebar_content | 侧边栏内容 | 文件变更 / MCP / LSP 状态 |
注册方式分两种模式:"replace" 替换整个 slot,不传 mode 则添加进去。
插件目录结构
关键踩坑点:TUI 插件必须有 package.json 并声明 exports["./tui"],光放一个 .tsx 文件不生效。正确的结构:
~/.config/opencode/plugins/custom-logo/
├── package.json
└── tui.tsx
package.json 长这样:
{
  "name": "custom-logo",
  "version": "1.0.0",
  "type": "module",
  "exports": {
    "./tui": "./tui.tsx"
  },
  "peerDependencies": {
    "@opencode-ai/plugin": "*",
    "@opentui/core": "*",
    "@opentui/solid": "*",
    "solid-js": "*"
  }
}
OpenCode 通过 exports["./tui"] 来定位 TUI 入口,没有这个声明插件就不会被加载。
插件代码
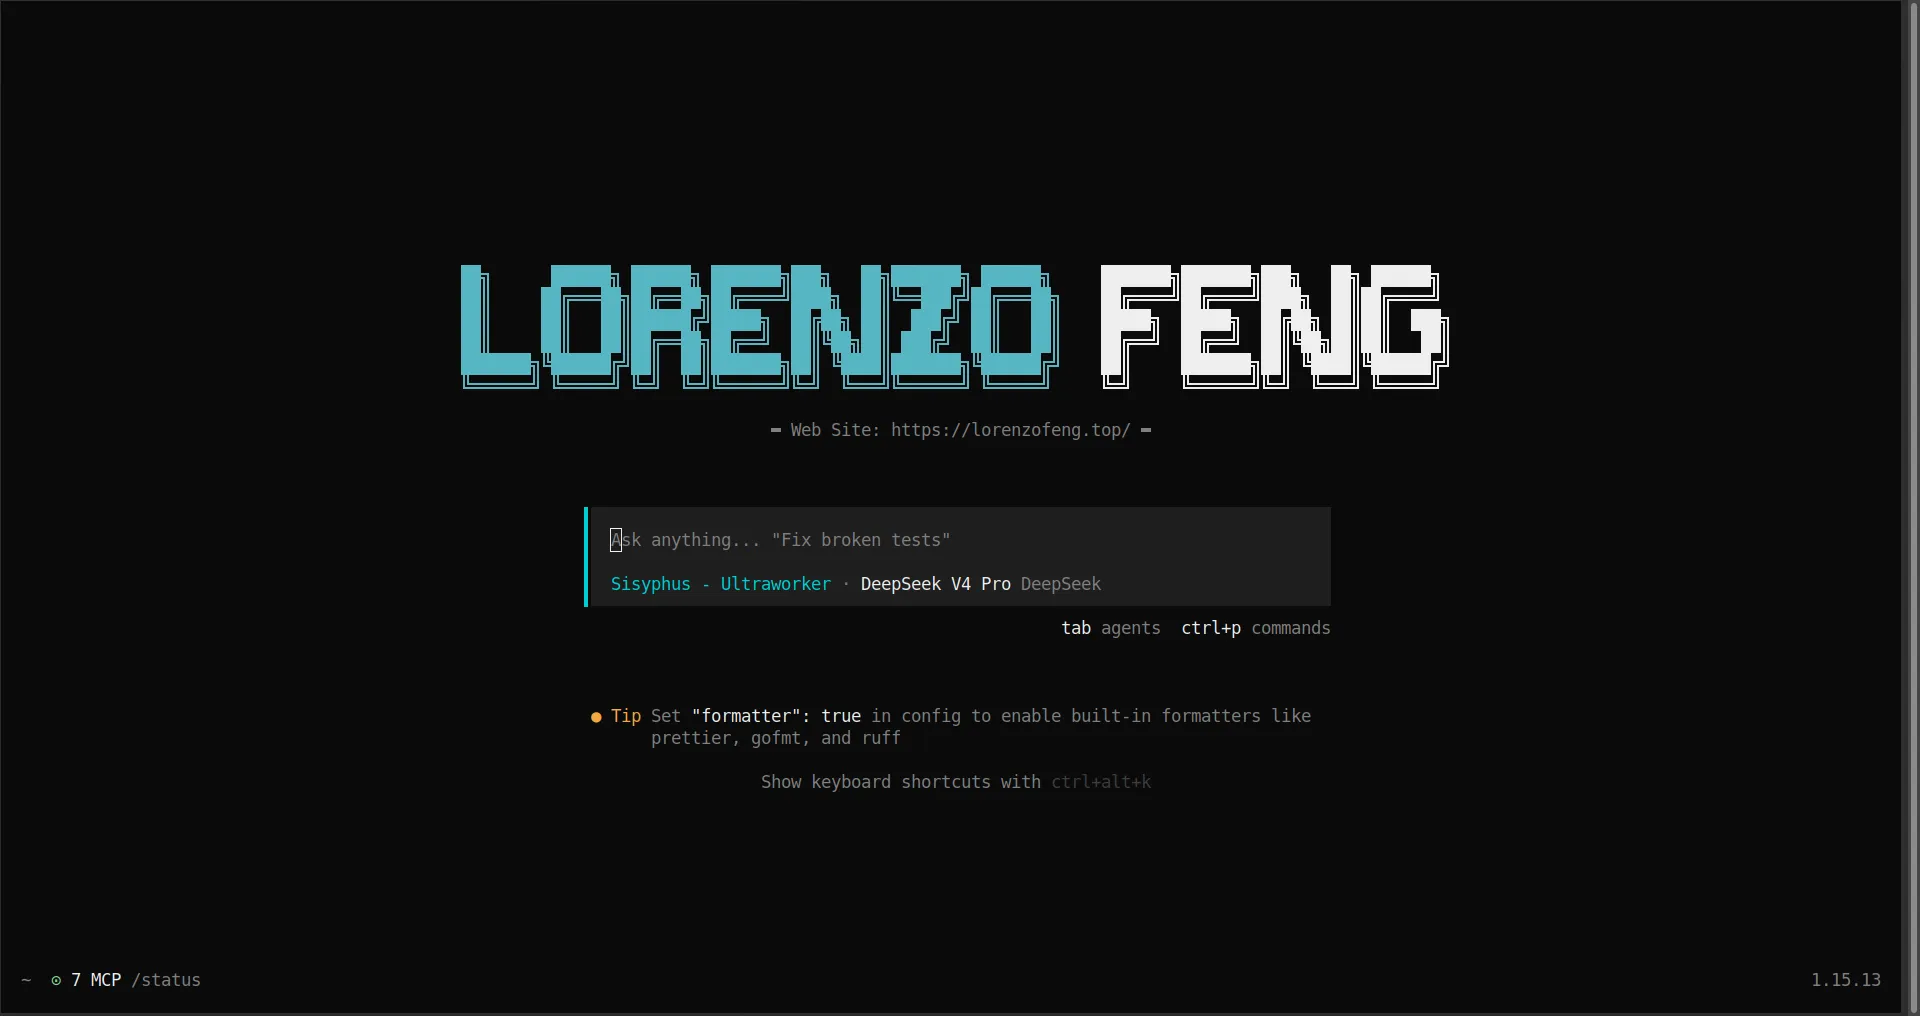
插件基于 Solid.js 和 @opentui/solid 渲染。把「Lorenzo」和「Feng」拆成两个独立数组,用 flex 布局左右排列,分别上蓝色和正文色:
/** @jsxImportSource @opentui/solid */
import type { TuiPlugin, TuiPluginModule, TuiThemeCurrent } from "@opencode-ai/plugin/tui"

const LORENZO = [
`
██╗      ██████╗ ██████╗ ███████╗███╗   ██╗███████╗ ██████╗
██║     ██╔═══██╗██╔══██╗██╔════╝████╗  ██║╚══███╔╝██╔═══██╗
██║     ██║   ██║██████╔╝█████╗  ██╔██╗ ██║  ███╔╝ ██║   ██║
██║     ██║   ██║██╔══██╗██╔══╝  ██║╚██╗██║ ███╔╝  ██║   ██║
███████╗╚██████╔╝██║  ██║███████╗██║ ╚████║███████╗╚██████╔╝
╚══════╝ ╚═════╝ ╚═╝  ╚═╝╚══════╝╚═╝  ╚═══╝╚══════╝ ╚═════╝
`
]

const FENG = [
`
███████╗███████╗███╗   ██╗ ██████╗
██╔════╝██╔════╝████╗  ██║██╔════╝
█████╗  █████╗  ██╔██╗ ██║██║  ███╗
██╔══╝  ██╔══╝  ██║╚██╗██║██║   ██║
██║     ███████╗██║ ╚████║╚██████╔╝
╚═╝     ╚══════╝╚═╝  ╚═══╝ ╚═════╝
`
]

const SUBTITLE = "Web Site: https://lorenzofeng.top/"

function HomeLogo(props: { theme: TuiThemeCurrent }) {
  const lorenzoColor = props.theme.info      // 蓝色
  const fengColor = props.theme.text          // 正文色
  const muted = props.theme.textMuted
  const gap = "    "

  return (
    <box flexDirection="column" alignItems="center">
      <box flexDirection="row">
        {/* LORENZO —— 蓝色 */}
        <box flexDirection="column">
          {LORENZO.map((line) => (
            <text fg={lorenzoColor}>{line}</text>
          ))}
        </box>
        {/* 间距 */}
        <box flexDirection="column">
          {LORENZO.map(() => (
            <text fg={muted}>{gap}</text>
          ))}
        </box>
        {/* FENG —— 正文色 */}
        <box flexDirection="column">
          {FENG.map((line) => (
            <text fg={fengColor}>{line}</text>
          ))}
        </box>
      </box>
      <text> </text>
      <box flexDirection="row" gap={1}>
        <text fg={muted}>━</text>
        <text fg={muted} bold>{SUBTITLE}</text>
        <text fg={muted}>━</text>
      </box>
      <text> </text>
    </box>
  )
}

const tui: TuiPlugin = async (api) => {
  api.slots.register({
    mode: "replace",
    slots: {
      home_logo(ctx) {
        return <HomeLogo theme={ctx.theme.current} />
      },
    },
  })
}

export default { id: "custom-logo", tui }
几个要点:
/** @jsxImportSource @opentui/solid */声明 JSX 编译目标,这句不能丢- Logo 拆成两个数组 →
<box flexDirection="row">横向排列 → 左边的 map 遍历LORENZO,右边的 map 遍历FENG slots.register()接受{ mode, slots }对象,"replace"表示完全替换 OpenCode 默认 Logo- slot 渲染函数接收
ctx上下文,通过ctx.theme.current拿到当前主题色
颜色配置
| 变量 | 用途 |
|---|---|
theme.primary | 主色 |
theme.accent | 强调色 |
theme.info | 蓝色系 |
theme.success | 绿色系 |
theme.warning | 黄色系 |
theme.error | 红色系 |
也可以用硬编码色值 fg="#ff6b6b",但不会随主题切换。
ASCII 艺术字生成
Logo 用的字体风格是 ANSI Shadow,生成工具推荐 patorjk.com/software/taag,有上百种字体可选。推荐几个适合终端显示的:
| 字体 | 效果 |
|---|---|
ANSI Shadow | 带阴影的块状字 |
Big | 简洁大方 |
Block | 实心方块 |
Doom | 游戏风格 |
Graffiti | 涂鸦风 |
注册插件
插件写好后需要注册。有两种方式:
方式一——自动发现:把插件放在 ~/.config/opencode/plugins/ 目录下,OpenCode 启动时自动扫描加载。
方式二——显式声明:在 opencode.jsonc 或 tui.json 的 plugin 数组中加绝对路径:
{
  "plugin": [
    "~/.config/opencode/plugins/custom-logo"
  ]
}
两种方式我都用了,确保万无一失。插件支持热更新,改 tui.tsx 后重进 TUI 即可生效,不需要重启 OpenCode。
总结
OpenCode 的 TUI 插件系统比预期灵活很多——slot 机制让几乎所有界面元素都可替换。虽然 Logo 不能通过配置文件直接改,但写一个十几行的插件就能搞定,而且能做的事情远不止换 Logo:侧边栏、输入框、状态栏都能深度定制。